September 14th, 2026
Usability Improvement
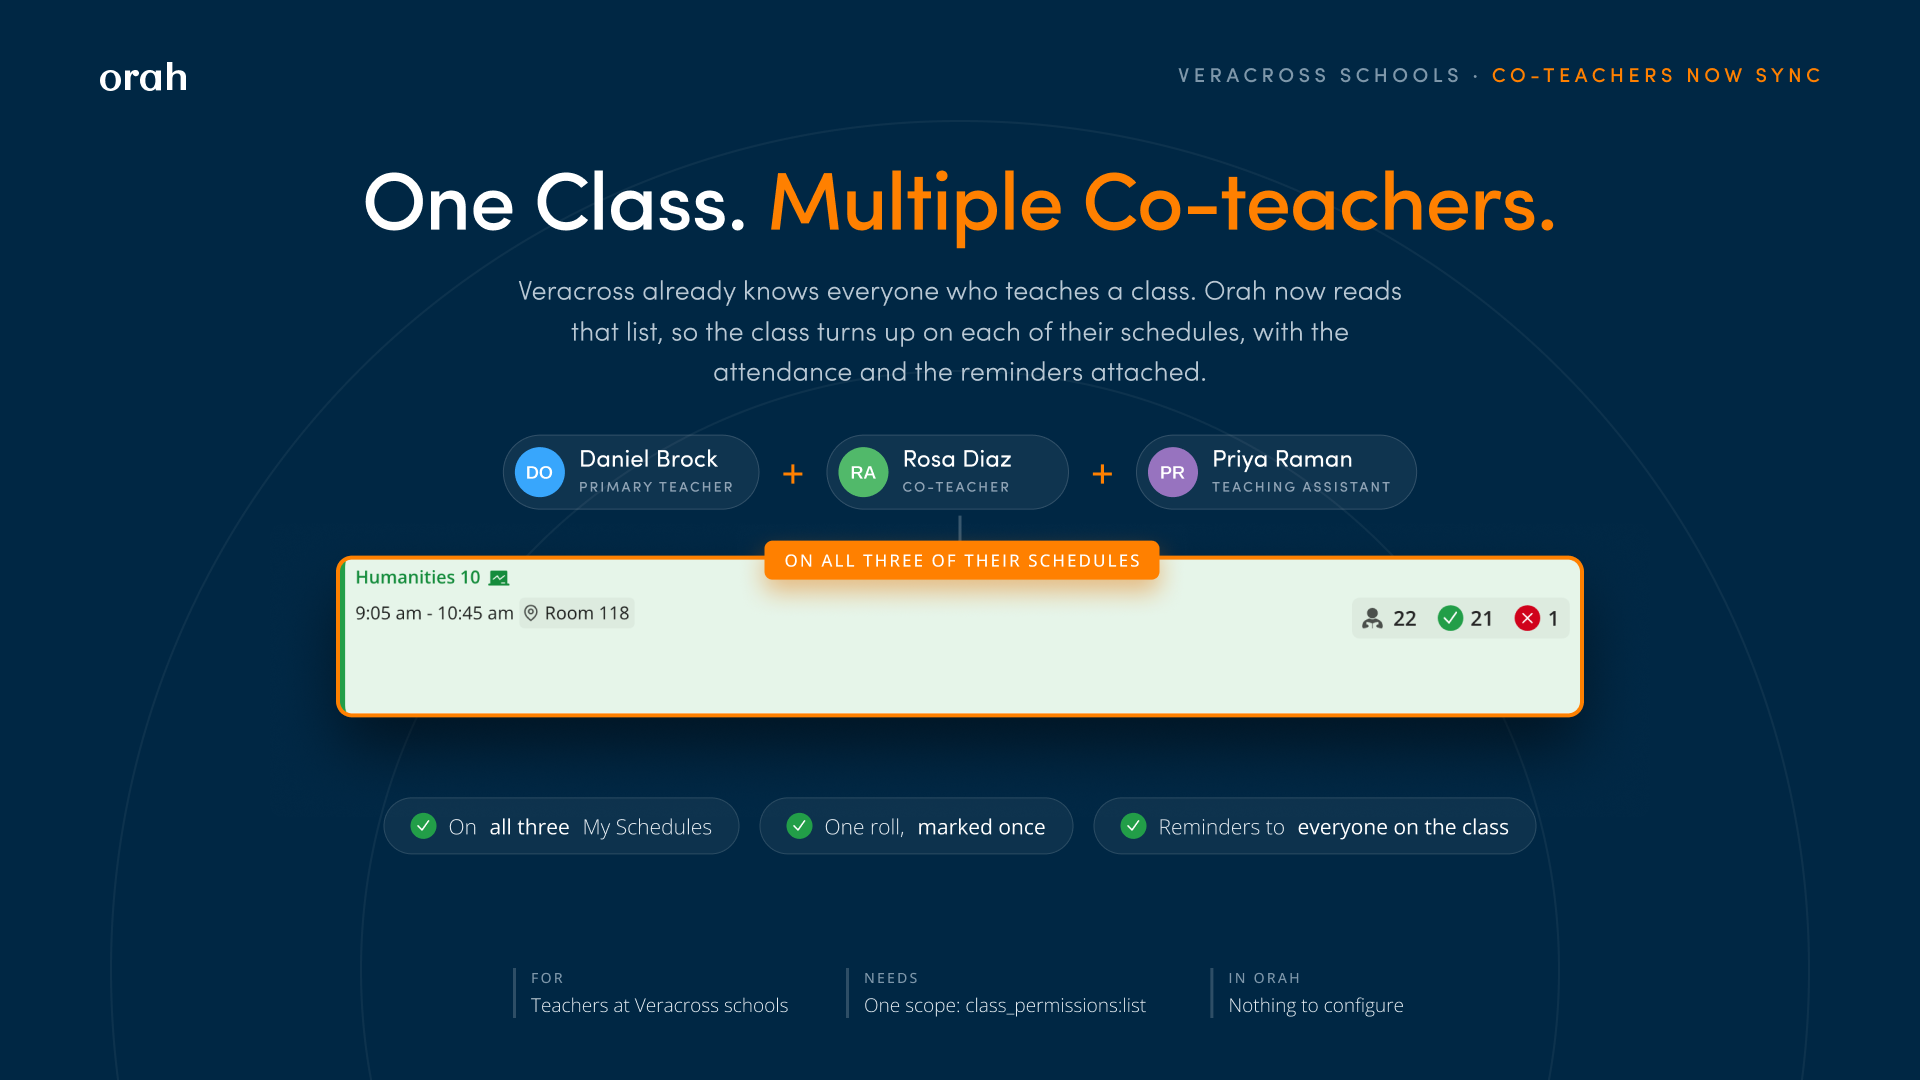
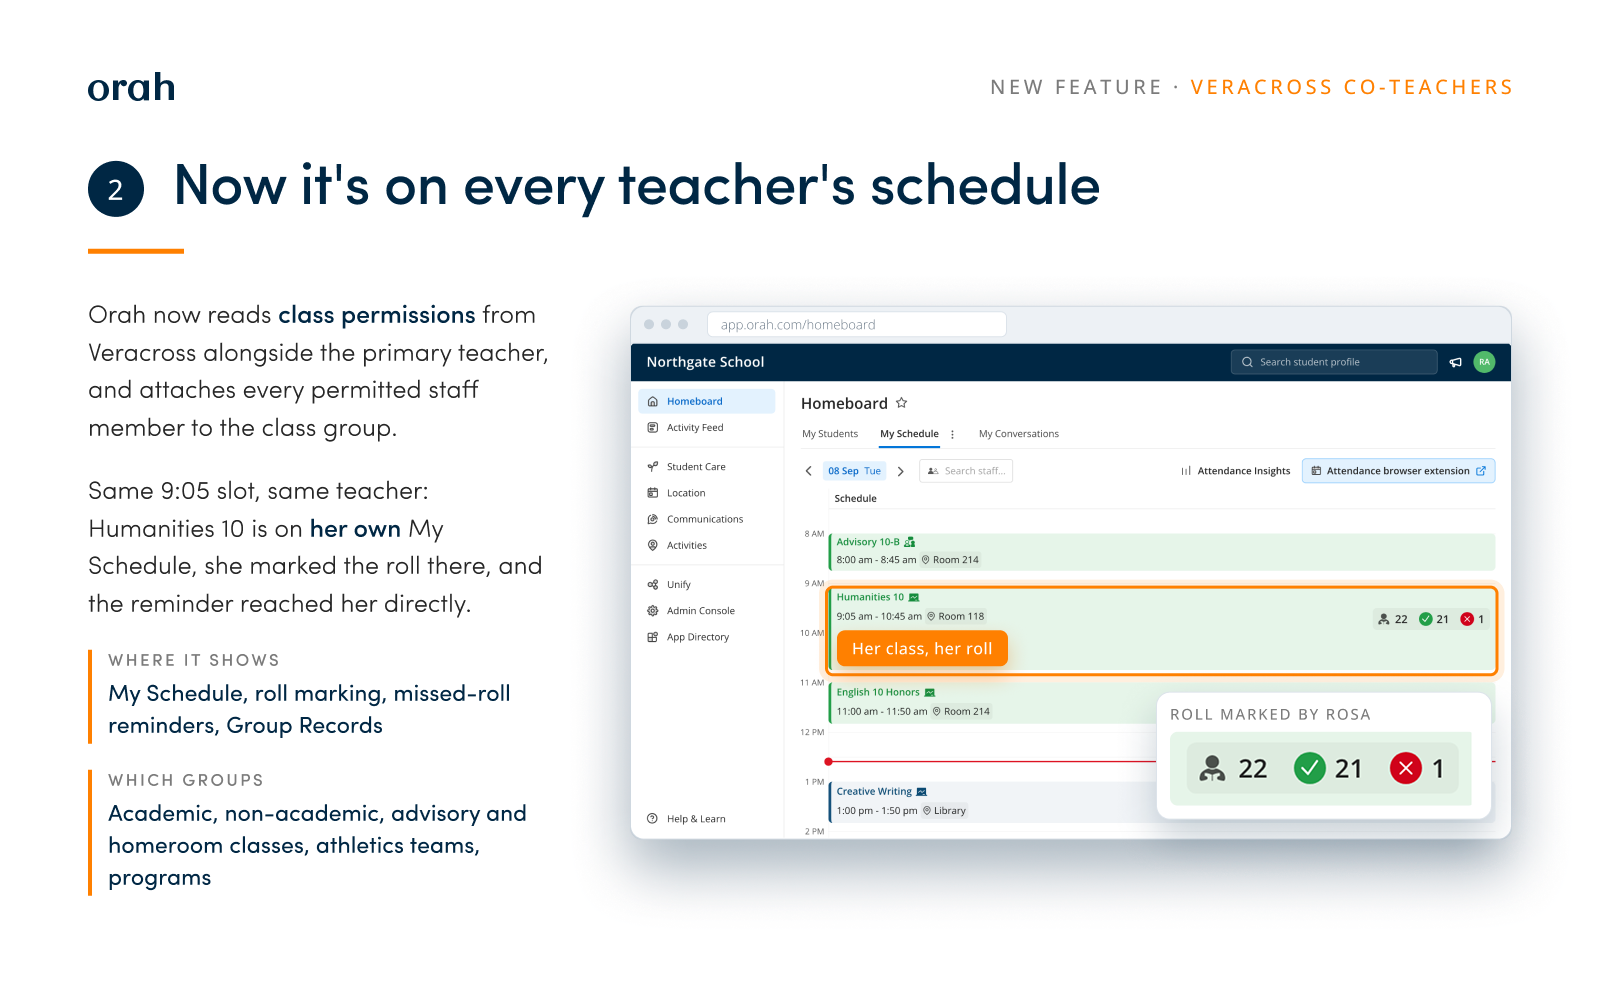
Veracross names one primary teacher per class, and that was the only name Orah read. Orah now also reads class permissions, so every teacher on a class sees it on their own My Schedule, marks the roll from there, and gets its reminders.
Overview
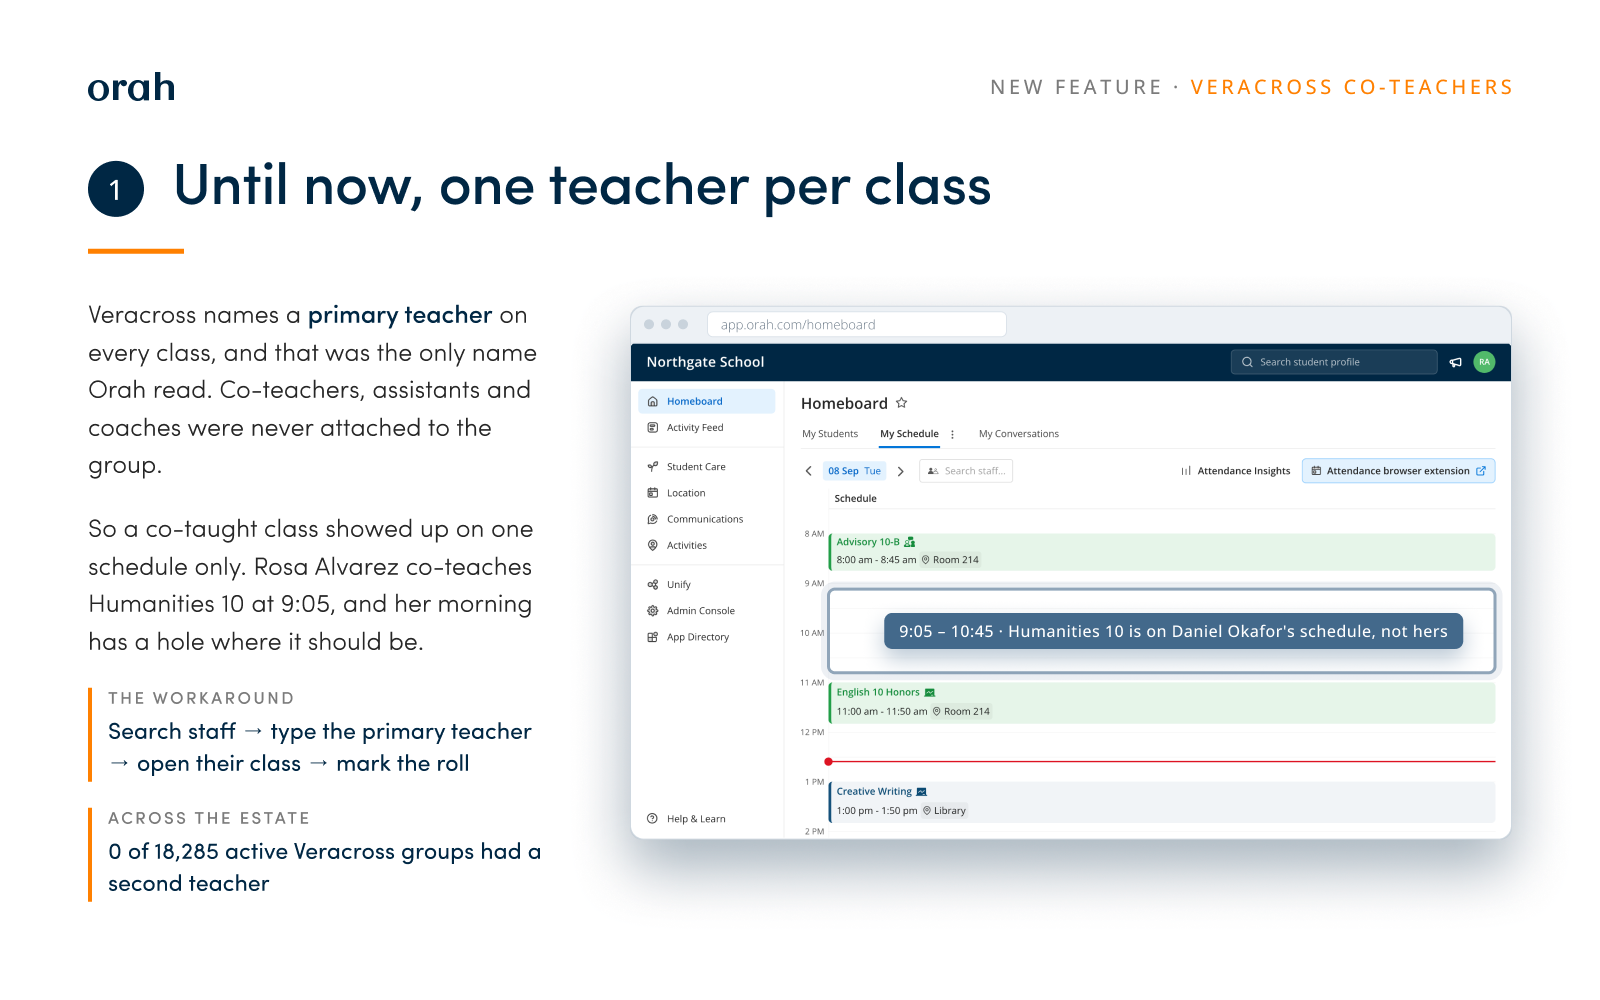
A co-taught class used to sit on one schedule only. The second teacher had to search for their colleague's name every day to find the roll, and reminders about it never reached them.
Now every staff member with a Veracross class permission is attached to the class group alongside the primary teacher. Academic, non-academic, advisory and homeroom classes, athletics teams and programs are all covered.
How it works
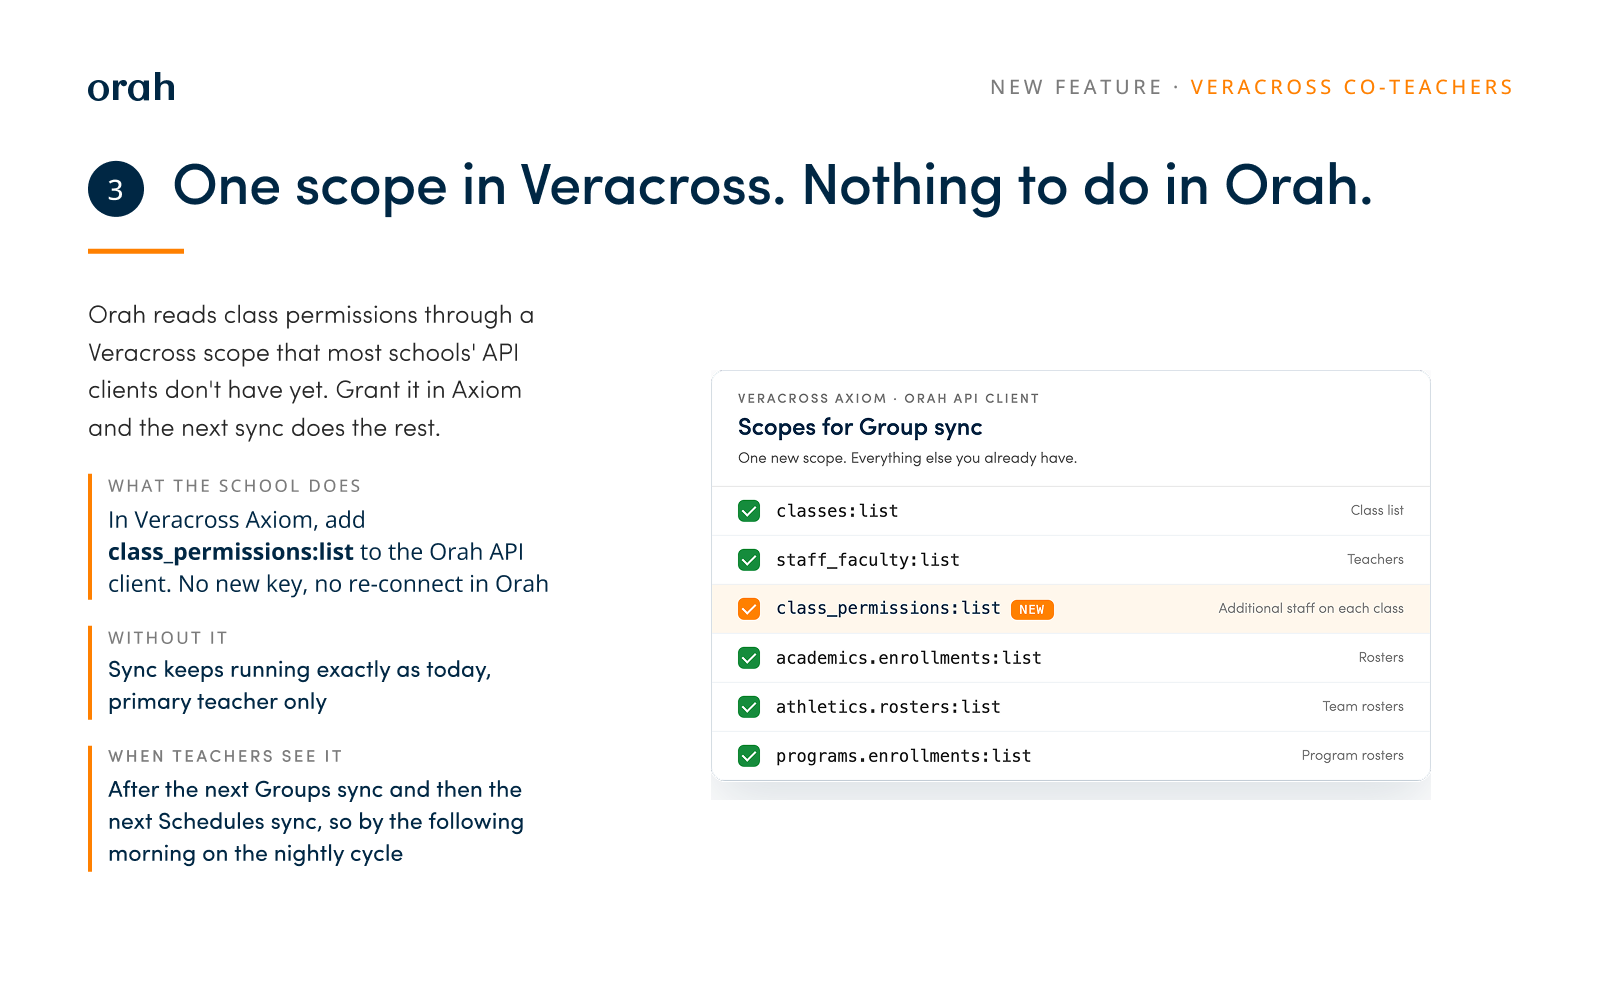
In Veracross Axiom, add the
class_permissions:listscope to the API client Orah uses. Nothing to change in Orah, no reconnect.Every permitted teacher now sees the class on My Schedule.
Once the Group & Schedule sync completes, every permitted teachers will be able to see the schedule in orah
Good to know
Additive. The primary teacher stays; permission holders are added alongside.
Without the scope, nothing changes. Sync keeps running with the primary teacher only.
Removals follow Veracross. Remove the permission and the teacher drops off the group at the next Groups sync.
Anyone with a class permission counts. Orah does not distinguish permission types, so view-only staff also get the class and its reminders. Review permissions in Veracross if that is not intended.
Classes with no primary teacher still do not sync. Permissions add staff to classes Orah already brings in.
For admins
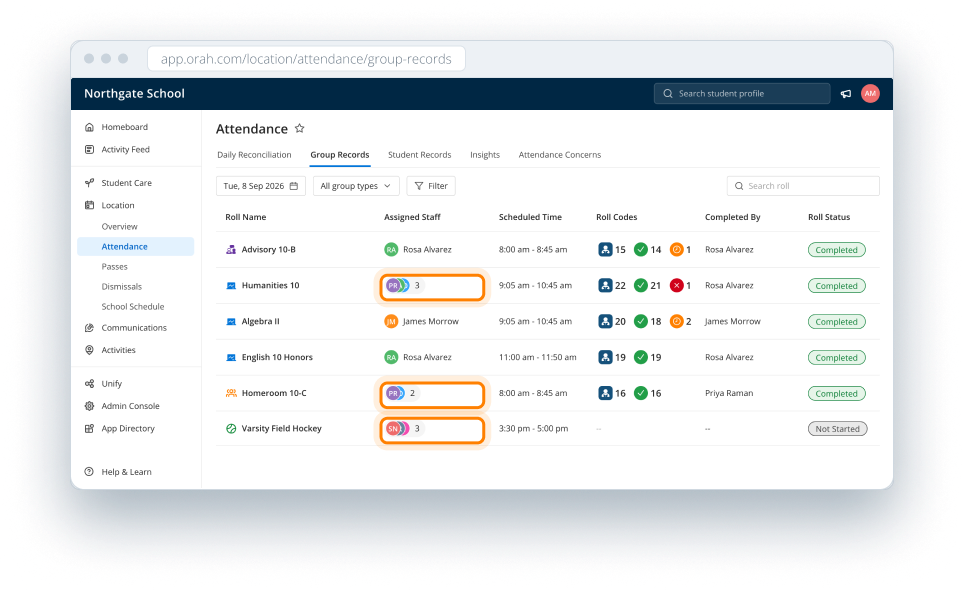
In Location → Attendance → Group Records, Assigned Staff stacks every teacher on the class, and Completed By records whoever actually marked the roll.
September 11th, 2026
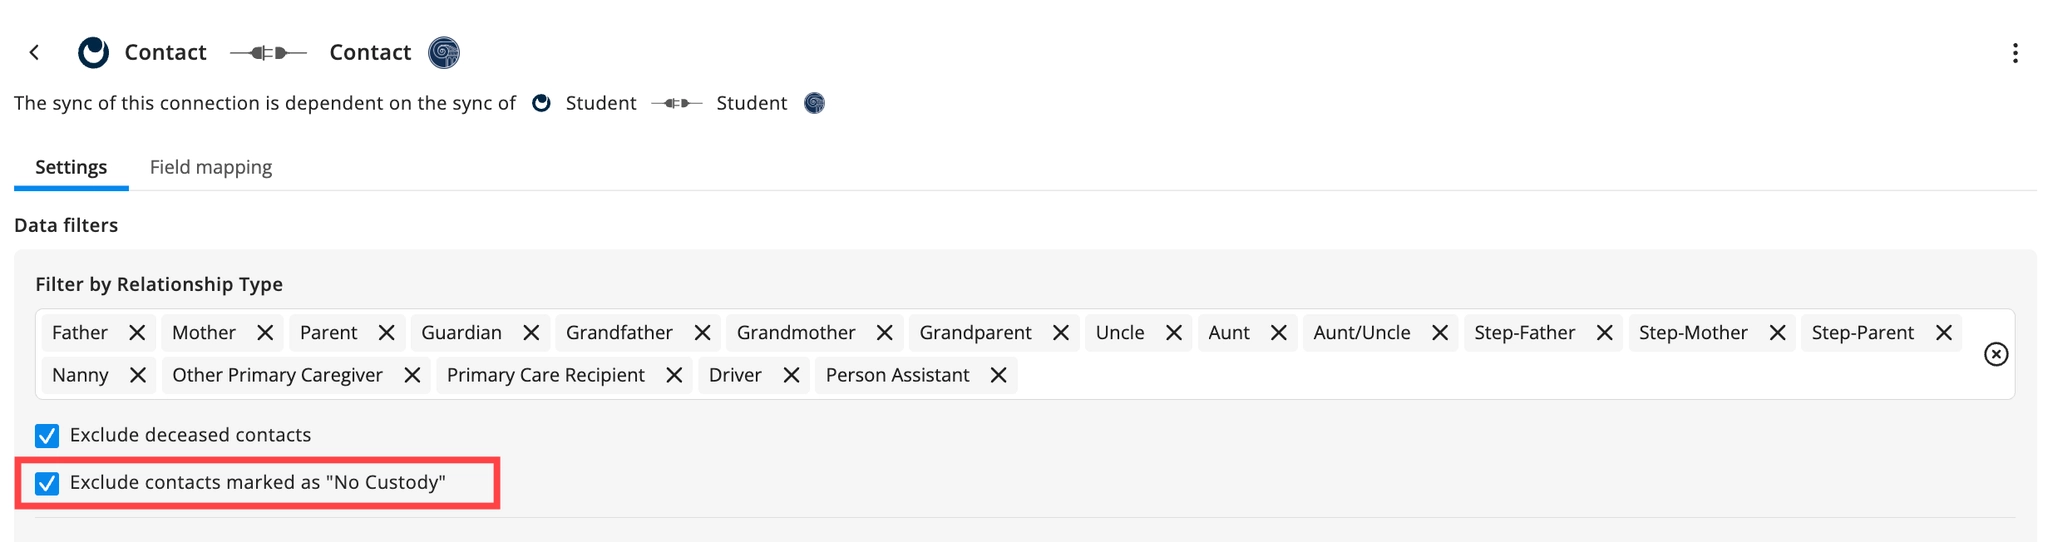
Veracross records a custody status on each family relationship. Until now we synced all of them, so a parent marked "No Custody" landed in Orah as a normal contact, which meant they could be invited to the Family app or chosen as a pickup contact.
There is now an opt-in filter to leave those relationships out:
App Directory > Veracross > Contact > Data filters > "Exclude contacts marked as No Custody"
What it does
Only an exact "No Custody" match is excluded. Joint custody, full custody, "N/A" and a blank status are all left alone.
Grandparents, nannies, drivers and step-parents are never caught, because they have no custody status recorded against them.
Off by default. Nothing changes for any school until someone ticks the box.
If the school's contact sync has Delete enabled, contacts the filter excludes are removed from Orah on the next sync.
What it does not do
It does not revoke access anyone already has. An existing Family app account or an outstanding invitation stays valid until it is removed separately. If a school needs that done too, let us know.
September 9th, 2026
New Feature
Demo:
The Snapshot
You can now create your own transport options like "Bus to Airport" or a named shuttle route right alongside Orah's built-in ones. Set them up once in a new Transport Settings tab, then filter and export your passes list by any transport type, including the ones you create.
What's New
Head to Pass Settings → Transport Settings to add, edit, deactivate, or delete transport options, each with its own name and optional extra details like Airline or Flight Number. If a pass type already has that transport option's extra details configured, later changes to the Transport Settings template won't overwrite them but pass types that haven't configured it yet will pick up the current template automatically. When staff pick a transport option while creating a pass, any extra detail fields already set up for it fill in automatically, and staff can still tweak those fields for that one pass without changing your global settings.
Why It Matters
Every school tracks transport differently a named bus route, a specific shuttle service, a partner airline shuttle. Instead of forcing everything into a handful of generic categories, you can name transport the way your school actually talks about it, then find and export exactly the passes that used it. And because edits only apply going forward, changing or removing an option never disrupts a pass that's already scheduled.
Next Steps
Go to Pass Settings → Transport Settings
Click Add Transport Option, give it a name (up to 30 characters) and any extra details you want collected
Toggle options active or deactivated, edit, or delete them any time — changes apply to new passes only
On the Passes list, use Filters → Departure/Return Transport to filter by any type, including your custom ones, then export as usual
September 8th, 2026
New Feature
Overview:
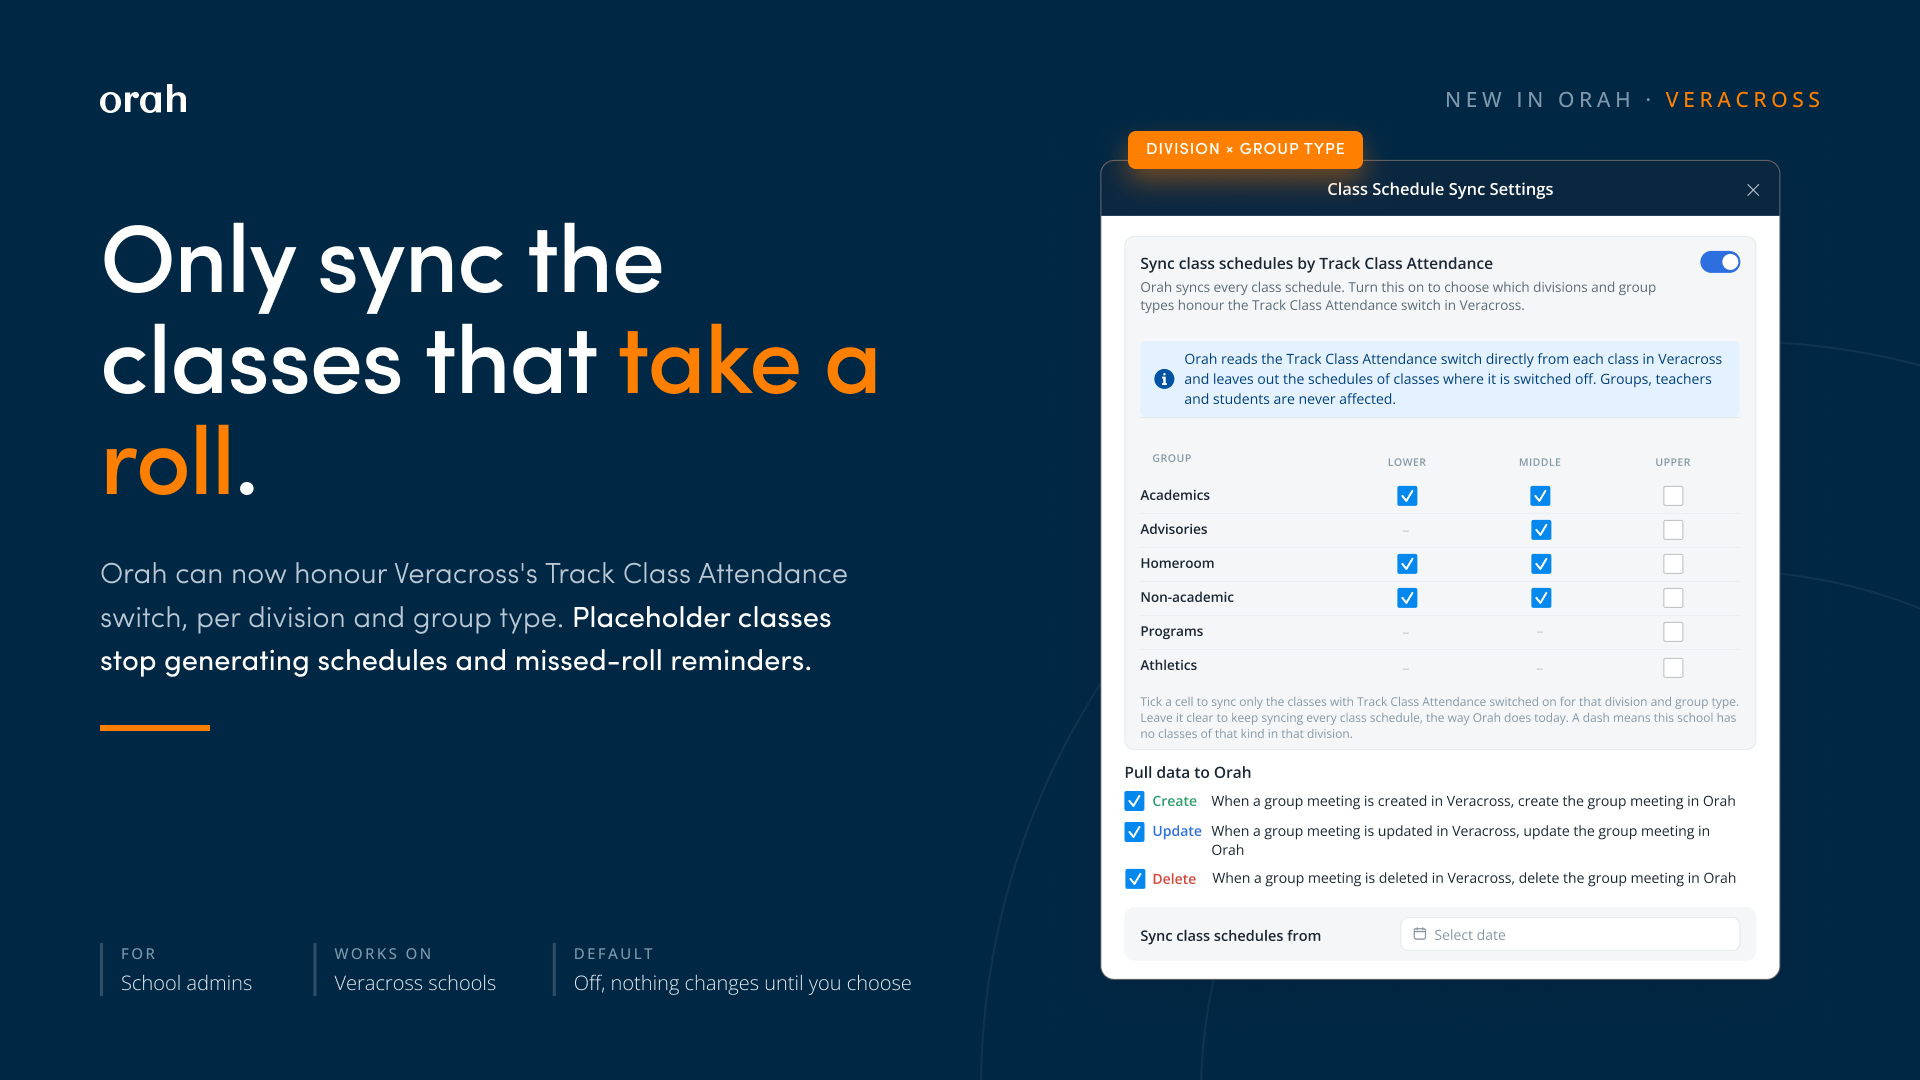
Every Veracross class carries a Track Class Attendance switch. Orah synced every class schedule regardless, so a study hall block or a Lower School homeroom that nobody takes a roll for still produced meetings, empty rolls, and reminder emails to teachers about attendance nobody expected them to take.
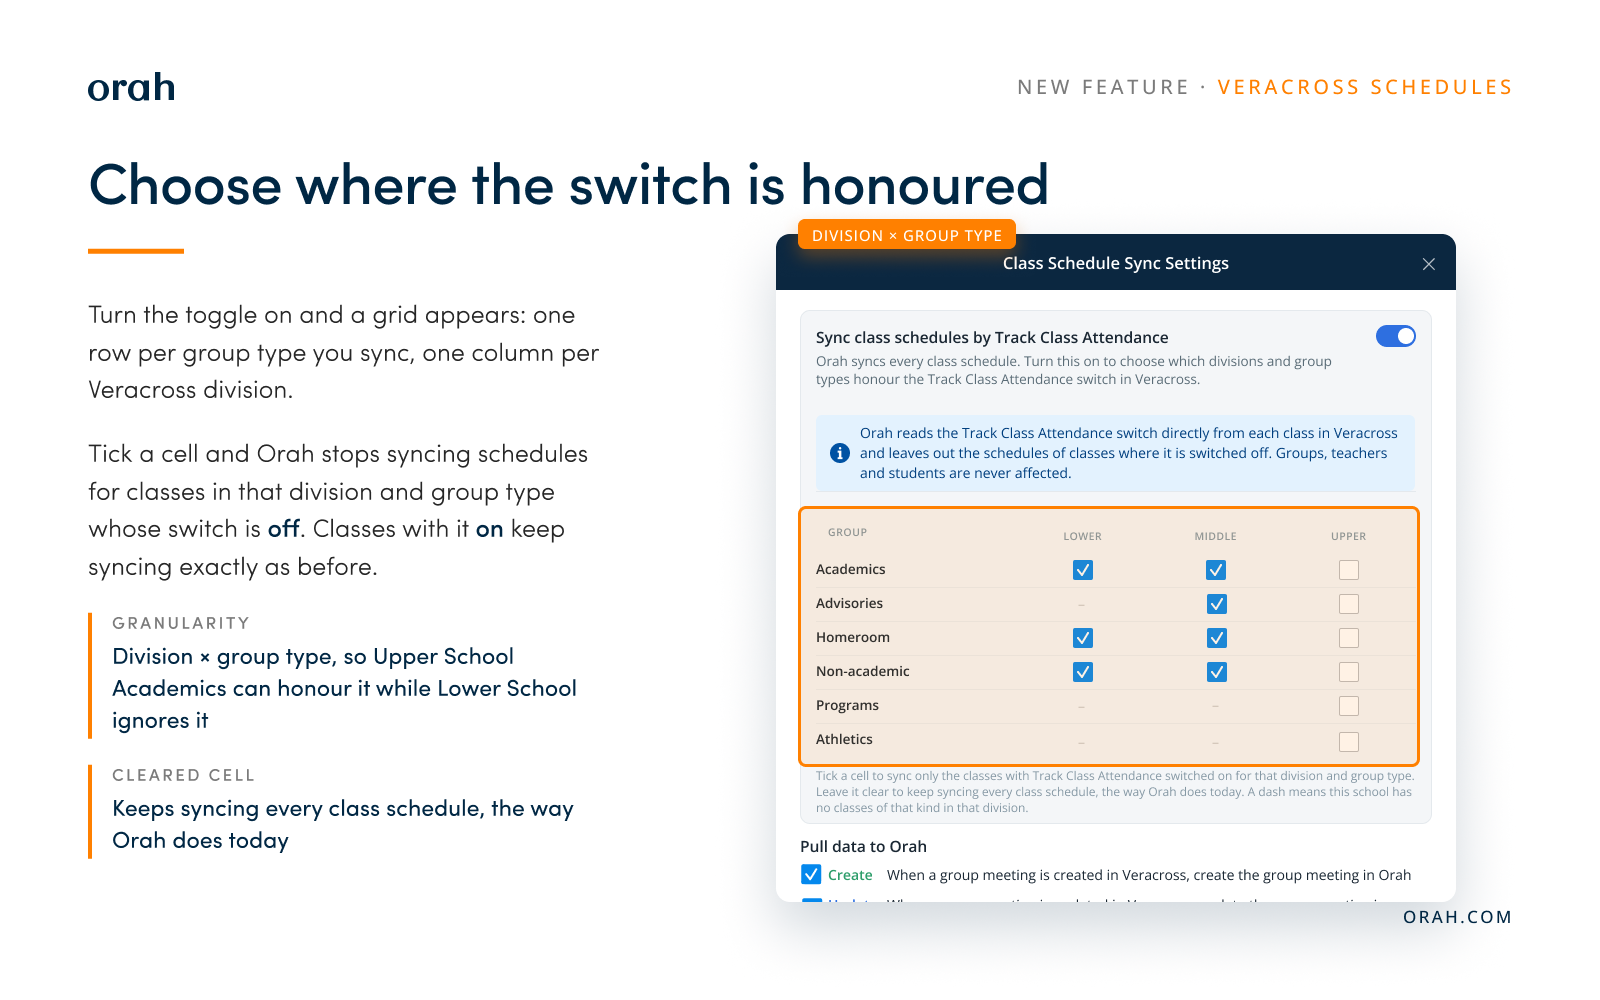
A new toggle on the Schedules sync tab, Sync class schedules by Track Class Attendance, opens a grid of divisions and group types. Tick a cell, and classes in it with the switch off stop syncing schedules. Classes with the switch on keep syncing exactly as before.
How it works
Open Manage integration for your Veracross connection, then Sync settings and the Schedules tab.
Turn on Sync class schedules by Track Class Attendance.
Tick the cells where you want the switch honoured. Leave a cell clear to keep syncing every schedule in it.
Save, then run a Groups and Schedules sync or wait for the next scheduled one.
What happens when you tick a cell
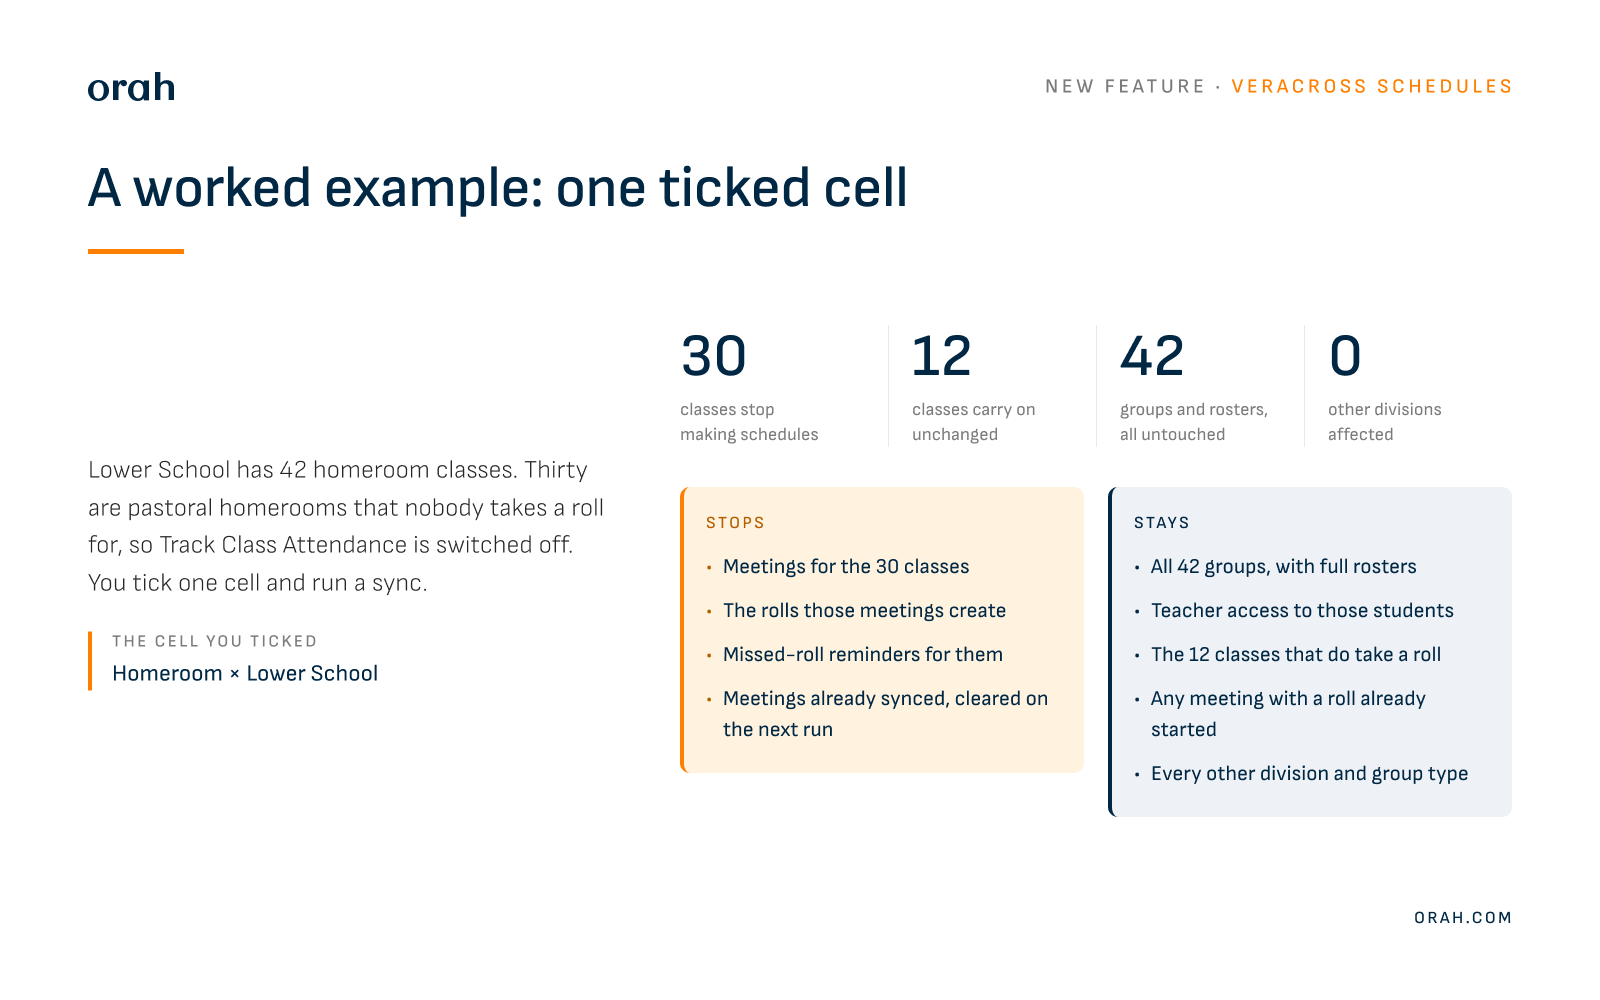
Say your Lower School has 42 homeroom classes in Veracross. Thirty of them are pastoral homerooms where nobody takes a roll, so Track Class Attendance is switched off. The other twelve do take a roll. You tick the one cell where Homeroom meets Lower School, save, and run a sync.
Good to know
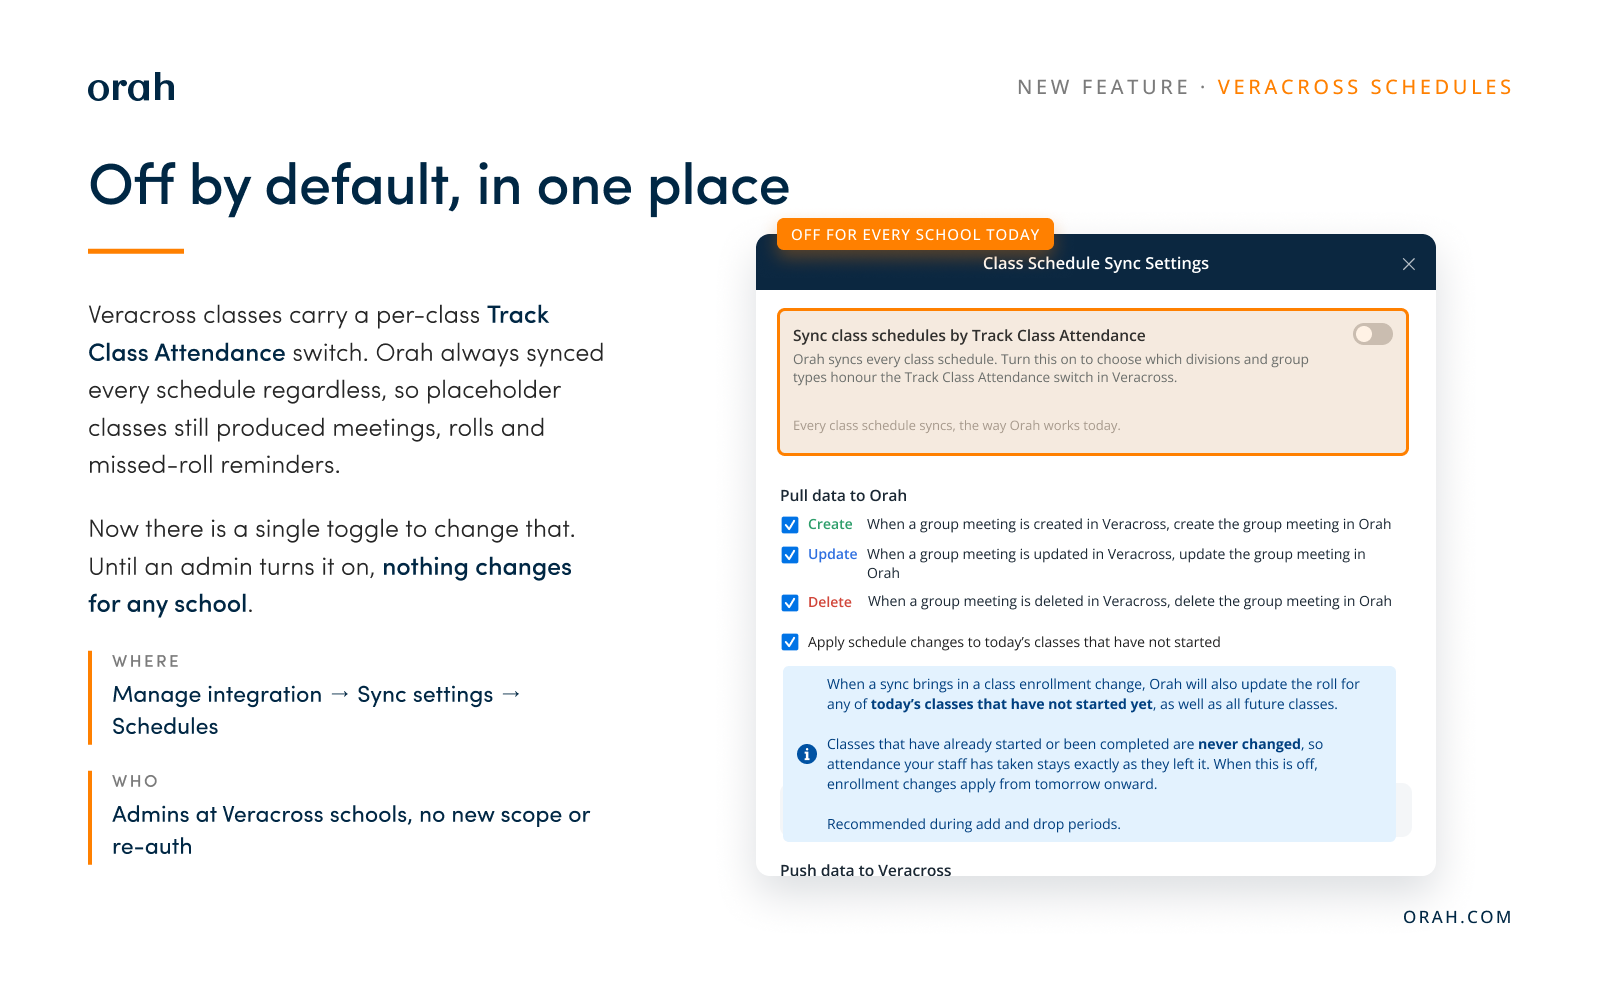
Off by default, for every school. Nothing changes until an admin turns the toggle on and ticks at least one cell.
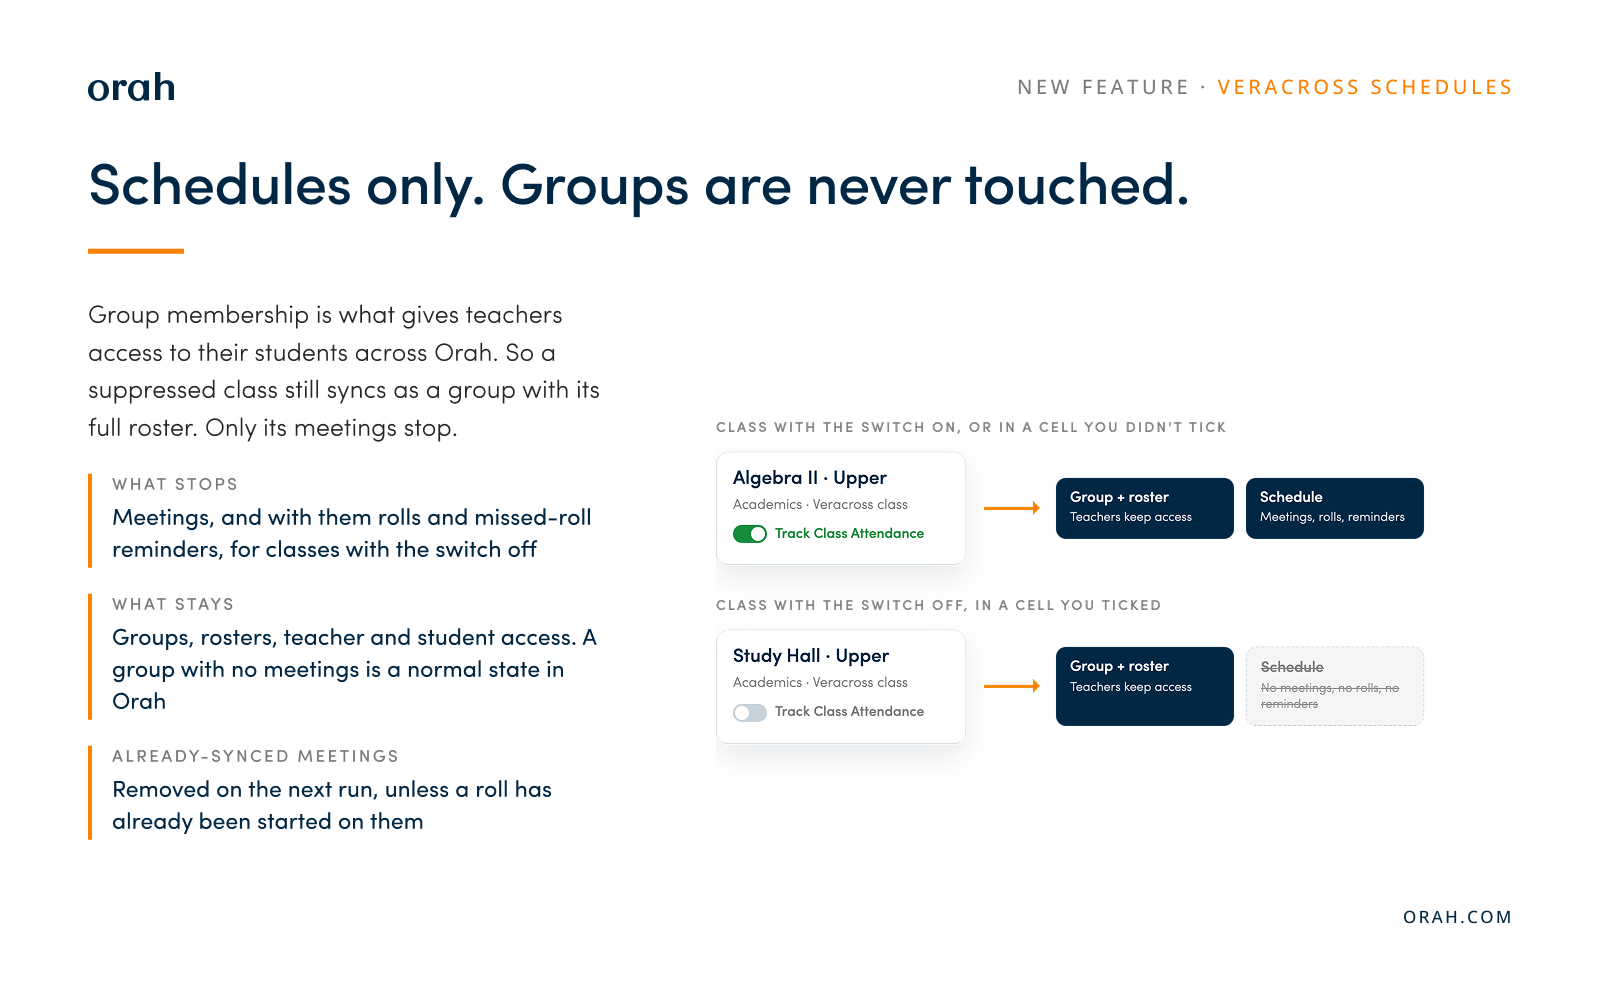
Schedules only. Groups are never touched. Group membership drives teacher access to students, so a suppressed class still syncs as a group with its full roster. Only its meetings stop.
Already-synced meetings are removed on the next run, unless a roll has already been started on them.
No new Veracross scope or re-authorisation. Orah reads the switch from the class list it already pulls.
Athletic practice schedules keep their own toggle on the same tab, now labelled Sync athletic practice schedules.
September 8th, 2026
New Feature
Overview:
The search box on Admin > Contacts now matches a contact's own name and email, not just the student they are attached to. Previously an admin who knew the contact but not the student had no way in, because contacts frequently have a different surname from their student. They had to work out the student's surname first, then search that. Contact matches are added to the results you already got, so nothing about searching by student changes.
How it works
Go to Admin > Contacts.
Type a contact's first name, last name, or any part of their email address into the search box. The placeholder now reads "Search student or contact…".
Students who have a matching contact appear in the results, with that contact visible in the row.
Searching a student's name works exactly as it did before.
September 7th, 2026
Usability Improvement
Overview:
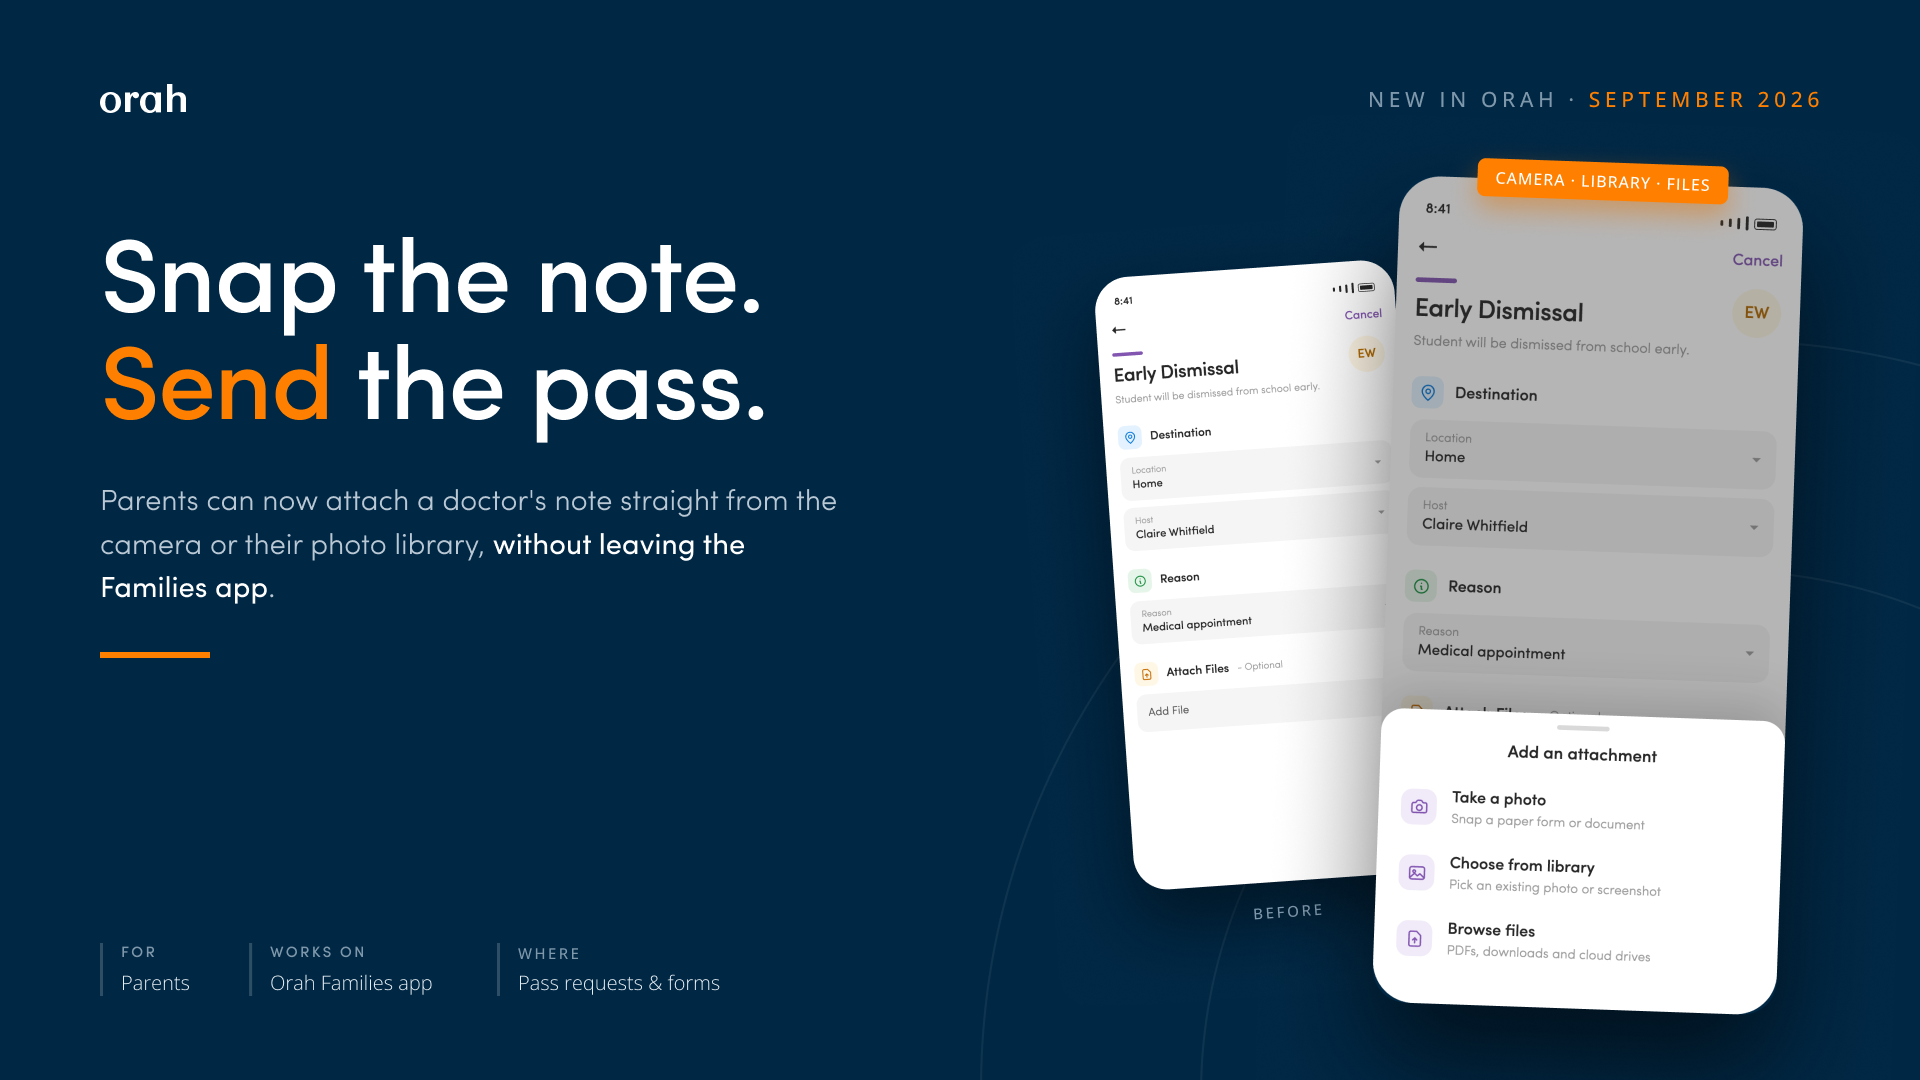
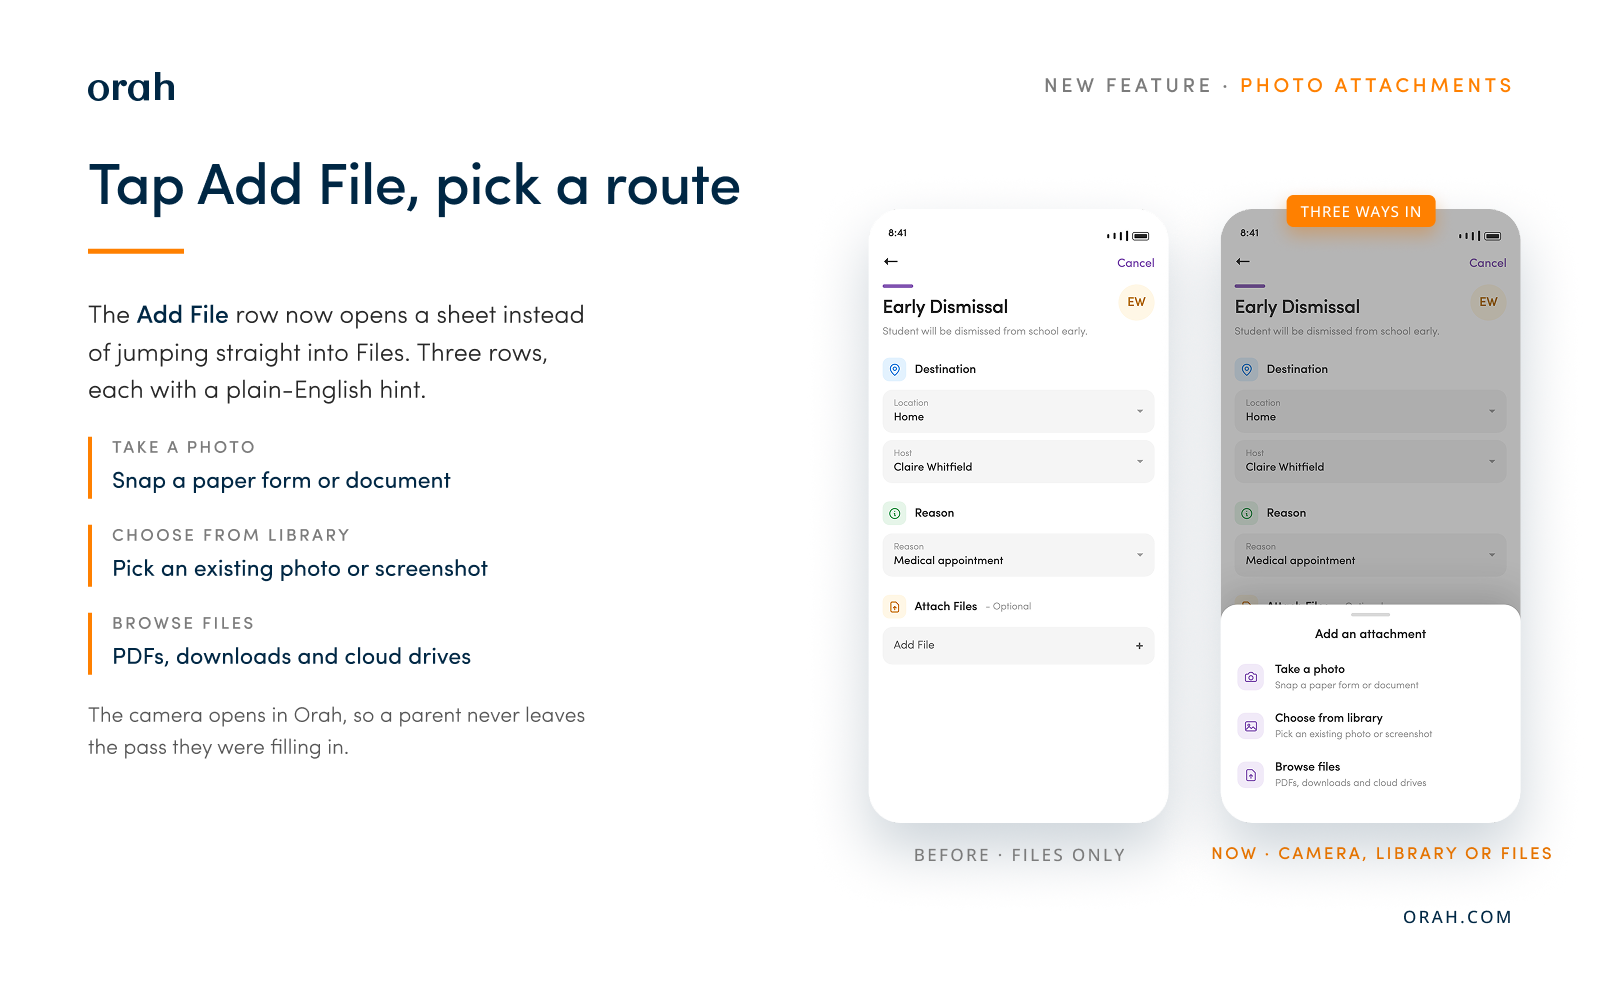
Parents can now take and attach photos directly from their device camera when creating passes in the Orah for Families app. Previously, parents had to first capture a photo in their camera app, save it, and then upload the file through a multi-step process. This streamlined workflow makes it faster to attach medical notes, permission slips, or other documentation when requesting leave passes for students.
How it works
In the Orah Families app, start a new pass or open a form that asks for a file.
Scroll to Attach Files and tap Add File.
Choose Take a photo, Choose from library, or Browse files.
Take or pick the photo. It attaches to the pass, and the request submits as it always did.
Good to know
Nothing to switch on - No new setting, no permission to configure. The attachment field appears wherever it already did, which means a pass type with Attach File enabled, or a form with a file upload question.
Parents need the updated app - This ships inside the Families app rather than as a server change, so a parent sees it once their phone has the new version.
Photos are resized before upload - Capped at 1920px on the longest side at quality 0.8, turning a typical 4-5 MB camera file into a few hundred KB. Still readable, and it finishes on a weak signal.
Denied permissions now say so - If camera or photo access is off for Orah, the app shows a message pointing at device Settings instead of appearing to do nothing.
September 7th, 2026
New Feature
Demo:
The Snapshot
The Daily Reconciliation page now has a dedicated Early Departure tab, so you can see and manage students who left early without digging through other records. You can view and edit these records right from the reconciliation screen — either in the detail view or with a quick Edit button on each card.
What's New
Open the new Early Departure tab alongside Absent and Late to see every student who left early that day in one place. Click into a card for the full detail modal, or use the Edit button directly on the card for a faster update. The Absent and Late tabs now run on the same improved attendance data model, so all three tabs behave consistently.
Why It Matters
Early departures used to mean piecing together the picture from elsewhere — now they sit right alongside Absent and Late, where reconciliation already happens. Editing a record straight from the card means fewer clicks to fix a mistake, and consistent data across all three tabs means what you see is reliable no matter which tab you're checking.
Next Steps
Open the Daily Reconciliation page
Select the new Early Departure tab
Click a card to open the full detail modal, or use the Edit button on the card for a quick change
Check the Absent and Late tabs as usual — they now share the same underlying data model
Questions about reconciliation? Reach out to your CSM.
September 4th, 2026
New Feature
Demo
The Snapshot
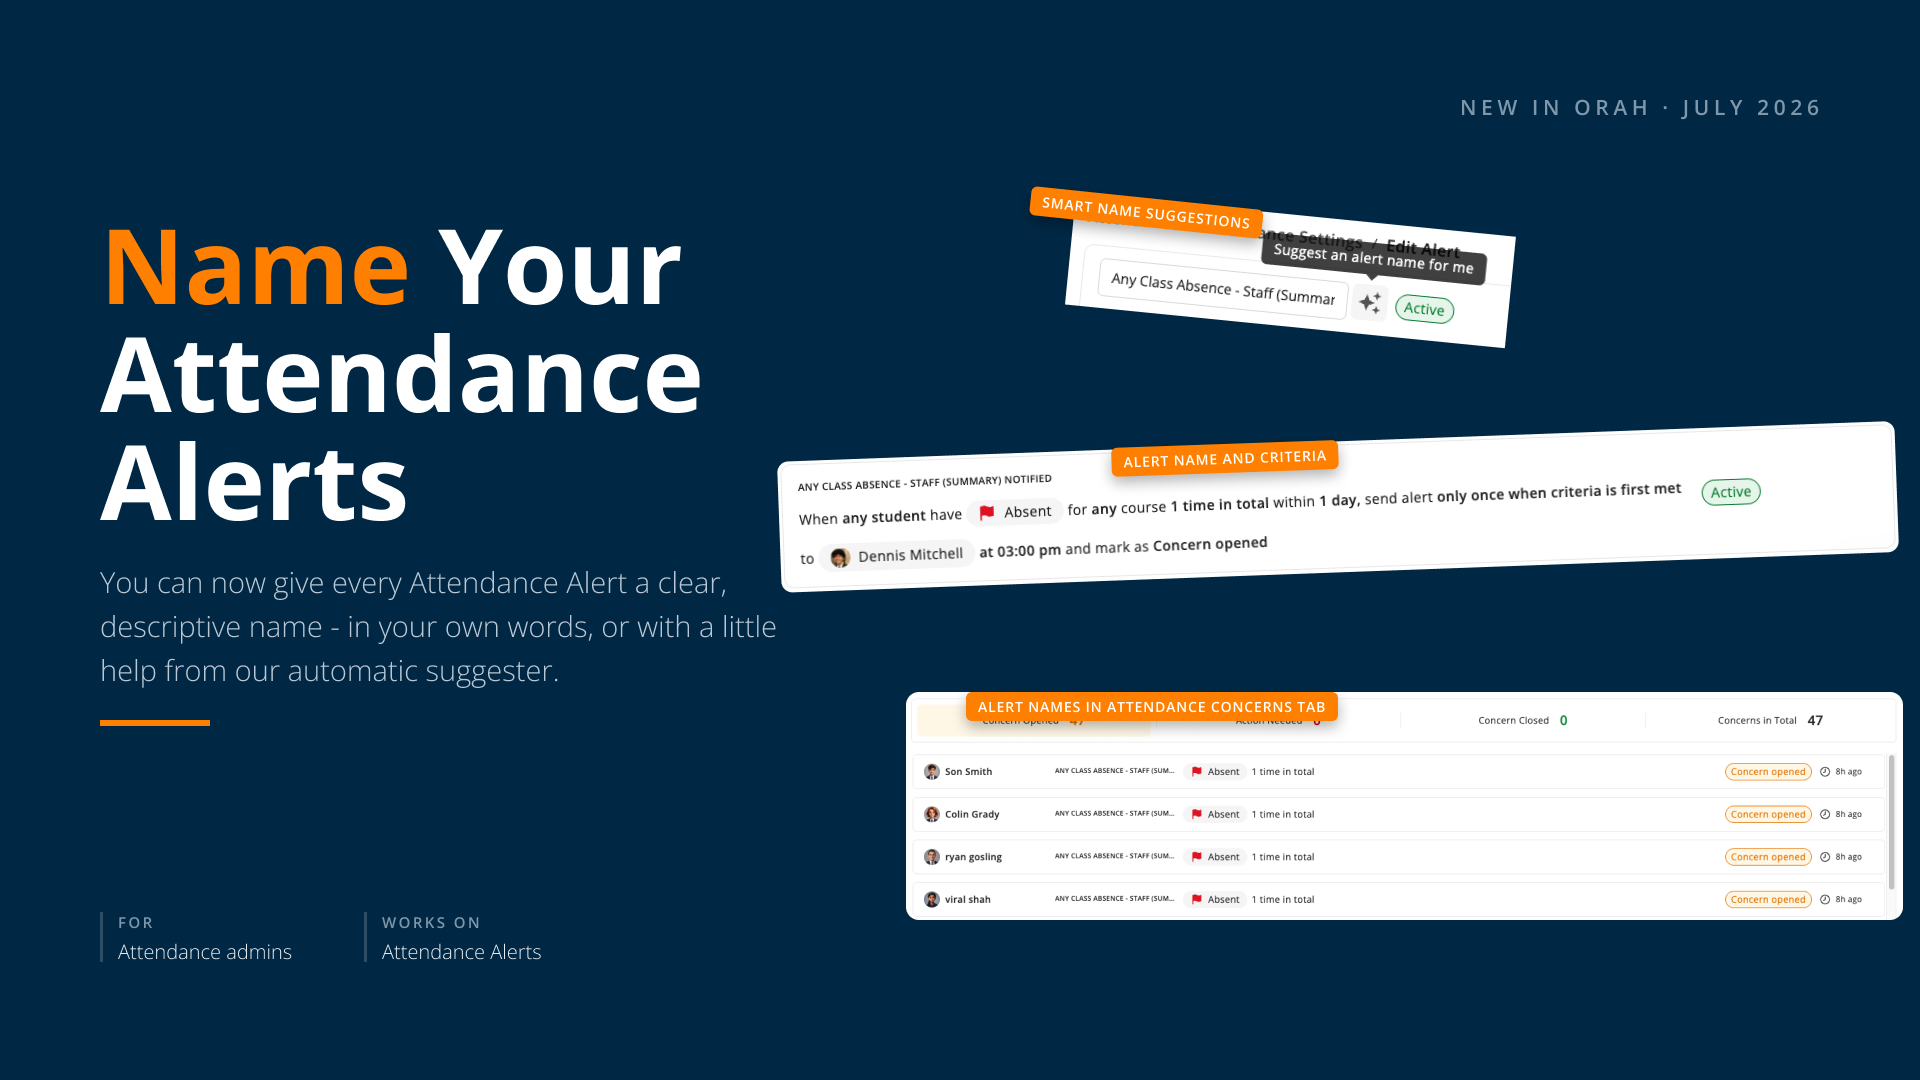
You can now give every Attendance Alert a clear, descriptive name — in your own words, or with a little help from our automatic suggester. When you create or edit an alert, write one yourself using your school's own terms, or click to generate a suggestion based on its conditions, frequency, timeframe, student scope, and recipients. That name then shows up everywhere the alert appears, so it's obvious at a glance what each one does.
What's New
In Attendance Settings, every alert now has a Name field. Write your own using the language your school already uses, or click to generate an AI suggestion drawn from the alert's conditions, frequency, timeframe, student scope, and recipients. AI suggestions adapt to your school's own naming style over time — wording, casing, and formatting included — so they read like your team wrote them. Once set, the name appears in Attendance Settings, Alert History, Attendance Concerns, and the alert's own record.
Why It Matters
Once you've got several alerts running for different year levels, absence patterns, or time windows, a clear name means anyone on your team can scan Alert History or Attendance Concerns and know immediately what triggered it — no need to open each one to check. Because AI suggestions pick up your school's own naming style, new alerts stay consistent with the ones you've already named, even as more staff set them up over time. It's a small change that keeps your whole team speaking the same language around attendance.
Next Steps
Open Attendance Settings > Alert Settings and select the alert you want to name
Click edit
Type your own name, or click to generate an AI suggestion
Adjust the suggested name if you like, then save
Repeat for other alerts whenever it suits you — existing alerts stay unnamed until you update them
Give it a try next time you're reviewing your alerts. Questions? Reach out to your CSM.
September 3rd, 2026
New Feature
Demo:
The Snapshot
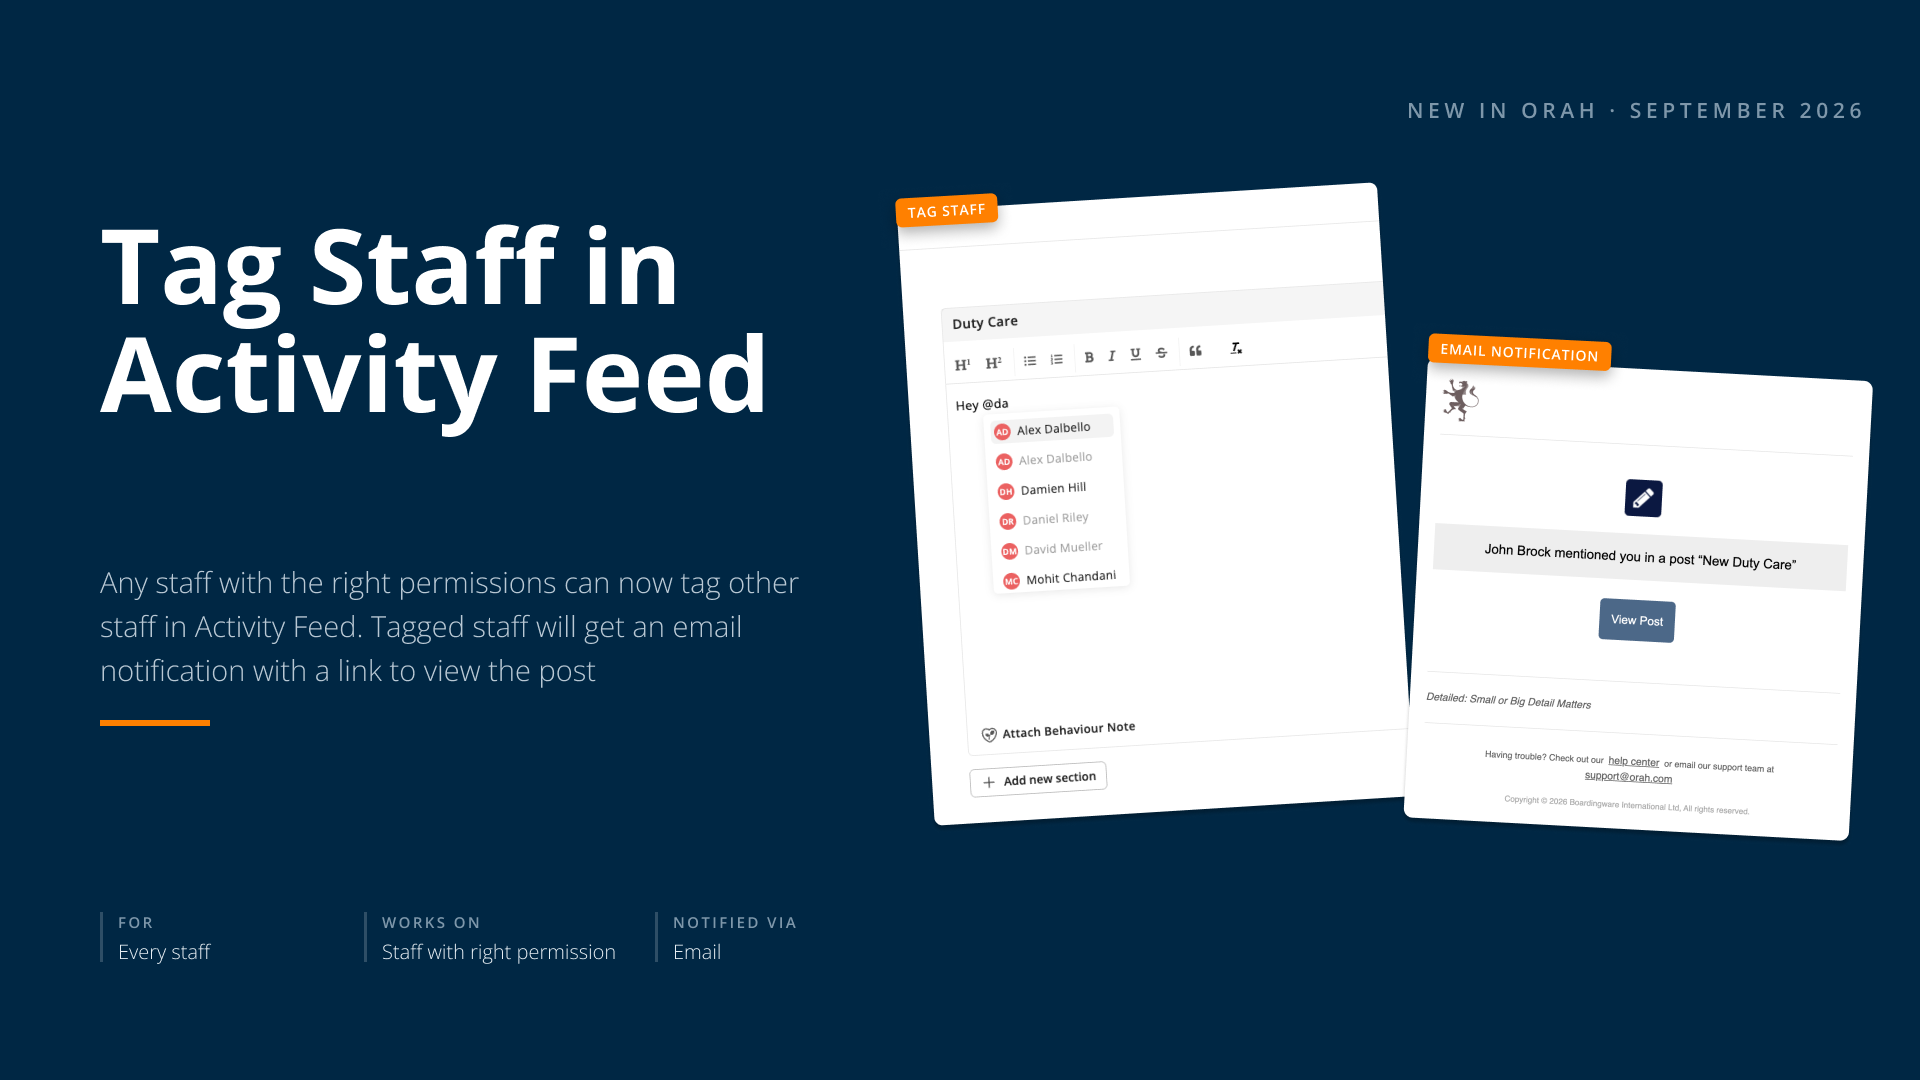
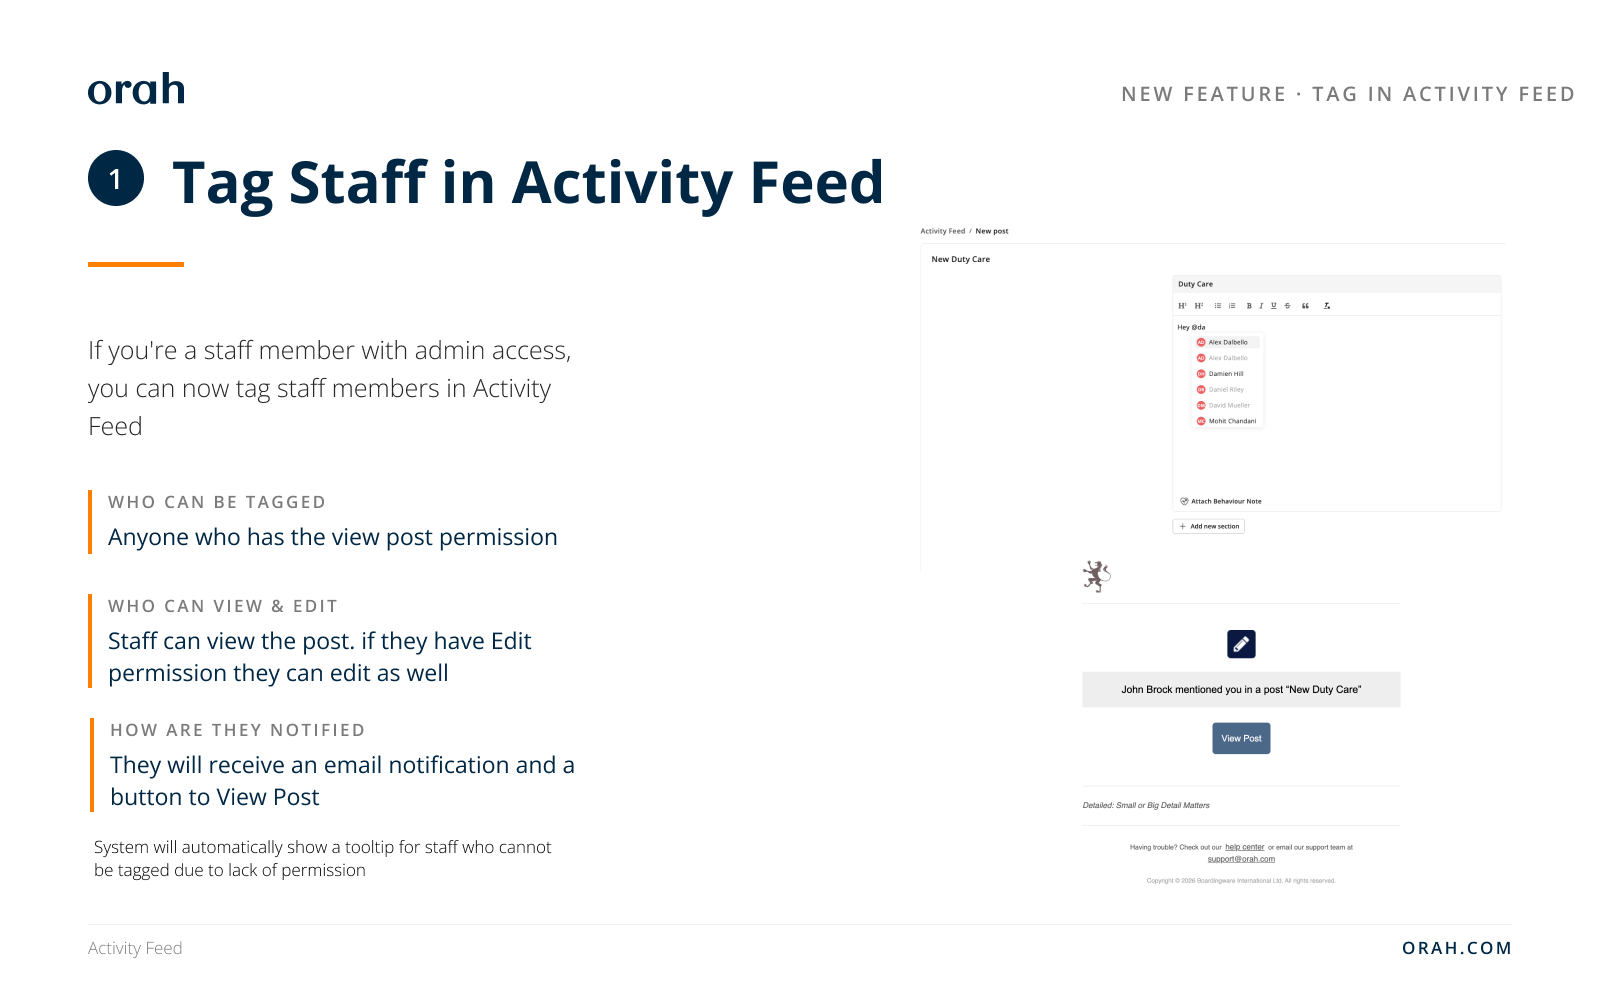
You can now tag a specific colleague in an Activity Feed post by typing @ followed by their name. They'll get an email notification with a direct link straight to that post.
What's New
Type @ and a name to bring up a filtered, scrollable list of matching staff. If someone on that list doesn't have permission to view the post, they still appear — just greyed out, with a hover explanation so you know upfront they won't be notified. Once you tag someone who does have access, they receive an email pointing them straight to the post. For scheduled posts, that email only goes out once the post actually goes live, not the moment it's scheduled.
Why It Matters
No more hoping the right person happens to scroll past an update. If there's someone specific who needs to see a post, you can pull them in directly — and because tagging respects existing view permissions, you're never left wondering whether a tag will actually reach someone who's meant to see it.
Next Steps
Start writing or editing an Activity Feed post
Type @ followed by a colleague's name
Select them from the list — greyed-out names indicate they won't be notified due to permissions
Publish (or schedule) the post — tagged staff with access receive an email linking directly to it
Questions about tagging? Reach out to your CSM.
August 27th, 2026
Usability Improvement
Overview:
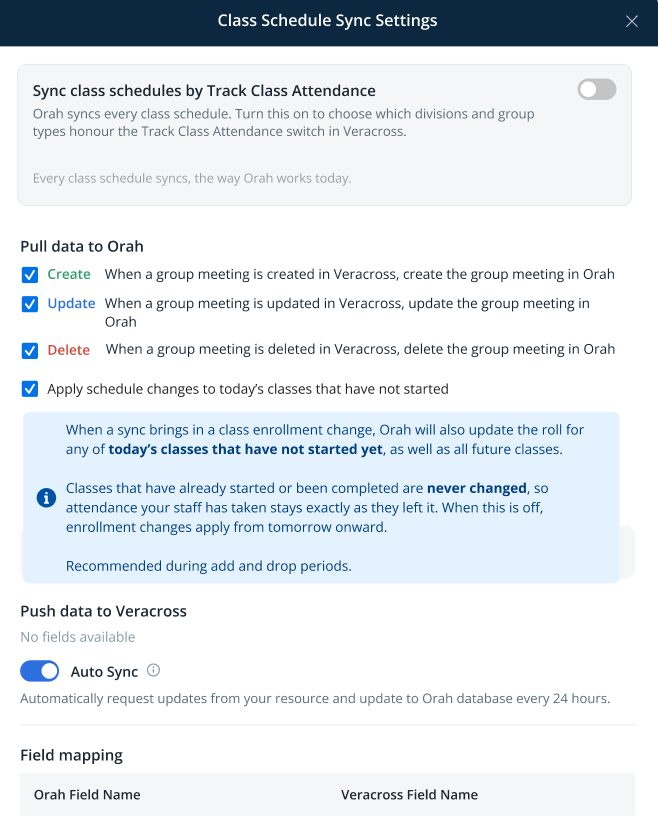
We've resolved an issue where student schedules weren't updating in Orah on the same day the change was made in your SIS.
Previously, when a student was added to or removed from a class, Orah applied that change to future schedules only. Today's class rolls kept the roster they were created with, even after a successful sync, so a teacher could open a roll that was missing a newly enrolled student or still listing one who had left. This was most disruptive during add/drop periods, and the only workaround was to discard the roll and let Orah rebuild it.
A new setting, Apply enrollment changes to today's schedules whose rolls have not started, changes this. When it is on, enrollment changes apply to all future schedules and to any of today's schedules whose roll has not started yet. Rolls that have already started or been completed are never rewritten, so attendance your staff has already taken stays exactly as they left it.
Available for Blackbaud, Veracross, FACTS, Synergetic and TASS.
How to turn it on:
Go to Admin Console and open Data Integration.
Open the SIS integration you want, for example Blackbaud.
Click Schedule.
Tick Apply enrollment changes to today's schedules whose rolls have not started.
Click Save.
Run a Groups and Schedules sync, or wait for the next scheduled sync to run.
Good to know:
Newly connected integrations have this on by default. Existing integrations stay off until an admin turns it on and saves, so nothing changes for a school until they choose it.
Started and completed rolls are locked. If a class has already begun or attendance has been taken, its roster will not change. Those classes still update from the next day onward.
When the setting is off, enrollment changes continue to apply from tomorrow onward, exactly as before.
Recommended during add/drop periods.